
Applying a waterproof coating to plywood is an important part of building or repairing boats. It will protect the plywood from water damage and extend its lifespan if done properly. Here are two methods you can use to waterproof plywood for a boat.
- Method 1. Waterproofing Plywood For A Boat With Epoxy Resin
- Step 1. Setup And Materials
- Step 2. Cleaning The Plywood
- Step 3. Let The Plywood Dry
- Step 4. Sanding The Plywood
- Step 5. Mixing The Epoxy
- Step 6. Laying The Epoxy
- Step 7. Removing The Air Bubbles From The Epoxy
- Step 8. The Second Coat Of Epoxy
- Step 9. Removing The Wax Layer From The Epoxy
- Step 10. The Second Sanding
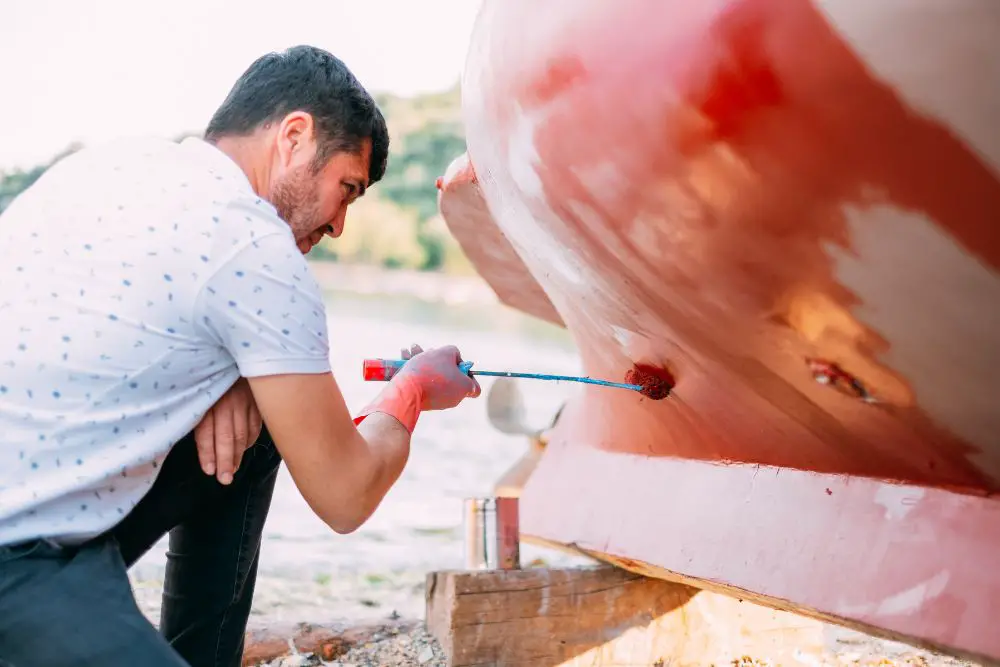
- Step 11. Painting The Plywood
- Method 2. Waterproofing Plywood For A Boat With Latex Based Paint
- Marine Grade Plywood
- Marine Plywood Durability
- Why Sealing Boat Plywood Is Important
- Using Epoxy for Waterproofing And Boat Repairs
- The Pros And Cons Of Latex Base Paint
- In Conclusion
Method 1. Waterproofing Plywood For A Boat With Epoxy Resin
Waterproofing plywood is an essential part of building a boat. Epoxy resin is one of the best ways to waterproof plywood. Here is how to do it.
Step 1. Setup And Materials
The first thing you need to do is gather the necessary materials. For this project, you will need plywood, epoxy resin, plastic sheeting, painter’s tape, gloves, a mixing container, stirring sticks, and a heat gun.
Step 2. Cleaning The Plywood
Once you have gathered all the materials, cleaning the plywood is next. You want to make sure that the surface is free of dirt and debris before you start working with the epoxy resin. The best way to do this is to use a power washer. If you don’t have access to a power washer, you can also use a hose and scrub the surface with a brush.
Step 3. Let The Plywood Dry
After cleaning the plywood, you need to let it dry completely before moving on to the next step. This usually takes about 24 hours. If there is any moisture left on the wood when you try to apply the epoxy resin, it will not adhere properly and your boat will not be waterproofed correctly.
Step 4. Sanding The Plywood
Once the plywood is dry, you’ll need to sand it down before applying the epoxy resin. This will help make sure that the resin adheres properly and creates a smooth surface for painting. To sand, the plywood, use a medium-grit sandpaper and sand in long strokes along the wood grain. Once you’ve finished sanding, wipe down the wood with a clean rag to remove any dust or debris before moving on to the next step.
Step 5. Mixing The Epoxy
Now it’s time to mix the epoxy resin according to the manufacturer’s instructions. Once the epoxy resin is mixed, you need to pour it into a large container to accommodate the entire piece of plywood.
Step 6. Laying The Epoxy
Next, lay down the epoxy resin onto the plywood using a paintbrush or roller. You want to ensure that you evenly coat all plywood surfaces. If there are any areas that are missed, they will not be protected from moisture and could potentially rot or succumb to mold growth.
Step 7. Removing The Air Bubbles From The Epoxy
Once you have coated the plywood with epoxy resin, you need to remove any air bubbles that may be present in the mixture. The best way to do this is to use a heat gun and slowly move it across the surface of the plywood. The heat will cause the air bubbles to rise to the surface and pop.
Step 8. The Second Coat Of Epoxy
After removing all of the air bubbles from the mixture, you can apply a second coat of epoxy resin for extra protection against moisture intrusion. Be sure to follow Steps 6 and 7 when applying this second coat of epoxy resin.
Step 9. Removing The Wax Layer From The Epoxy
After the second coat of epoxy has dried completely, you need to remove any wax buildup that may have occurred during application (this usually happens when using a paintbrush or roller). You can do this by using mineral spirits and a clean rag. Make sure that you ventilate the area well while doing this step, as inhaling fumes from mineral spirits can be harmful.
Step 10. The Second Sanding
After removing any wax buildup, you will need to wait about 24 hours for the epoxy to cure completely before proceeding to the second sanding. You want to use something like 220-grit sandpaper to create a smooth surface for painting. Be sure to sand in a well-ventilated area as inhaling dust from sanding can be harmful.
Step 11. Painting The Plywood
Once you have finished sanding, you are now ready to paint your plywood! You can either paint it with a fresh coat of paint or stain it to create the desired finish for your boat project!
Method 2. Waterproofing Plywood For A Boat With Latex Based Paint
If you’re like most boat owners, you take a lot of pride in your vessel. After all, your boat is more than just a mode of transportation—it’s your home away from home. That’s why keeping it well-maintained and in good working condition is so important.
One of the most important maintenance tasks you can do for your boat is waterproofing the plywood. This will protect the plywood from rot and water damage, and it will also extend its lifespan. Fortunately, waterproofing plywood is a relatively easy process that anyone can do. All you need is some latex-based paint and a few hours of time.
Here’s a step-by-step guide on waterproofing plywood for a boat with latex-based paint.
Step 1. Setup And Materials
Before you get started, you’ll need to gather a few supplies. In addition to latex-based paint, you’ll need primer, sandpaper, and a paintbrush. You may also want to wear gloves and a dust mask to protect yourself from the fumes. Once you have everything you need, it’s time to get started.
Step 2. Preparing The Plywood
The first step is to clean the plywood with soap and water. This will remove any dirt or grime that could prevent the paint from adhering properly. Once the plywood is clean, allow it to dry completely before moving on to the next step.
Step 3. Sand The Plywood
Once the plywood is dry, use sandpaper to rough up the surface. This will remove any dirt or debris that might be on the surface of the wood and will help the primer and paint adhere better. Be sure to sand evenly so that the surface is smooth when you’re finished.
Step 4. Apply Primer To The Plywood
Now it is time to apply primer to the plywood. Primer creates a smooth surface for paint and helps it adhere better. Pour some primer into a tray and then use a roller or brush designed for painting to cover the entire surface of the plywood with an even layer. Let the primer dry completely before proceeding to the next step—this usually takes around 24 hours.
Step 5. Sanding And Applying The Second Coat Of Primer
Once the first coat of primer is dry, sand the plywood again until it’s smooth. Then apply a second coat of primer and allow it to dry completely before proceeding to the next step.
Step 6. Applying The Latex-Based Paint
After the primer has dried, it is time to apply latex-based paint to waterproof your plywood—you will want to use outdoor paint for this project as regular interior paint will not withstand being outdoors in inclement weather conditions.
Begin by pouring some paint into a tray and then using a roller or brush specifically designed for painting to apply an even layer over the entire surface of the primed plywood. Just like with primer, ensure that you let the paint dry completely before moving on; otherwise, it will not be effective.
Depending on how thick you applied the paint and what type of weather conditions are present, this could take anywhere from 24 hours t o 48 hours.
Marine Grade Plywood
One of the most important things to look for when purchasing plywood for a boat is that it is marine grade. This means that it has been treated with a water-resistant chemical that will help it withstand exposure to moisture and water. Marine grade plywood is an essential component in any boat-building project, so be sure to keep an eye out for it when making your purchase.
Marine Plywood Durability
Another factor to consider when selecting plywood for your boat is its durability. Marine plywood is designed to withstand harsh conditions and wear and tear, so it’s a good investment if you want your boat to last for many years. In addition, marine plywood is also less likely to warp or swell when exposed to moisture, which is another big plus.
Why Sealing Boat Plywood Is Important
Many boat owners don’t realize the importance of sealing their boat’s plywood. Exposed to the elements, plywood is susceptible to damage from UV rays, water, and humidity. Over time, this can cause the plywood to delaminate, crack, and rot. By sealing the plywood, you can extend its lifespan and protect your investment.
The sun’s UV rays can cause the plywood to break down over time. You can protect it from the sun’s damaging rays by sealing it.
Water can also cause damage to plywood. When left unsealed, water can seep into the cracks and crevices of the plywood, causing it to swell and eventually rot. By sealing the plywood, you can create a barrier that will prevent water damage.
Finally, humidity can also wreak havoc on boat plywood. If the wood is not sealed, humid air can cause it to warp and twist. Sealing the wood will help protect it from humidity damage.
Using Epoxy for Waterproofing And Boat Repairs
Wood is often used in boatbuilding, but it is not naturally waterproof. That’s why it’s important to waterproof plywood before using it for a boat project. There are several ways to do this, but one of the most effective is to use epoxy.
Epoxy resin can be mixed with hardeners to create a strong, durable, and waterproof bond. It can be used for coating, bonding, laminating, and fairing. In this article, we’ll show you how to use epoxy to waterproof plywood for a boat.
Coating with Epoxy:
One way to use epoxy is to coat the surface of the plywood. This will create a barrier that will seal the wood and prevent water from getting in. To do this, mix the epoxy resin and hardener according to the manufacturer’s instructions. Then, using a brush or roller, apply a thin layer of the mixture to the surface of the plywood. Let it dry for the recommended time before applying additional coats if necessary.
Bonding with Epoxy:
Another way to use epoxy is to bond two pieces of plywood together. This is often done when building boats because it creates a strong, durable joint that is resistant to water. To do this, mix the epoxy resin and hardener according to the manufacturer’s instructions. Then, using a brush or roller, apply a thin layer of the mixture to one side of each piece of plywood. Join the two pieces together and clamp them in place until the epoxy has cured.
Laminating with Epoxy:
Epoxy can also be used for laminating multiple layers of plywood together. This is often done to create a thicker piece of strong wood for boatbuilding projects. To do this, mix the epoxy resin and hardener according to the manufacturer’s instructions. Then, using a brush or roller, apply a thin layer of the mixture to one side of each piece of plywood. Join the pieces and clamp them until the epoxy has cured.
Fairing with Epoxy:
Finally, epoxy can be used for fairing purposes. This means that it can be used to fill holes or depressions in the surface of plywood so that it can be sanded and smoothed down. To do this, mix the epoxy resin and hardener according to the manufacturer’s instructions. Then, using a putty knife or other tool, apply the mixture into any holes or depressions in the surface of the plywood. Let it dry for the recommended time before sanding or painting as desired.
Uses for Epoxy Resin
In addition to waterproofing plywood, epoxy resin can also be used for bonding two different surfaces together. This makes it ideal for repairing cracks and holes in boats made from fiberglass or other materials. Simply mix the resin and hardener together and apply it to the affected area. The epoxy will bond the two surfaces together and create a water-resistant seal that will prevent further damage.
The Pros And Cons Of Latex Base Paint
Before painting your boat with latex-based paint, you should weigh the pros and cons of using this type of paint. Latex-based paint is inexpensive and widely available, but it has some drawbacks.
Pros of Latex-Based Paint
One of the biggest advantages of latex-based paint is that it is inexpensive. This type of paint is also widely available, so you should be able to find it at most hardware stores. Latex-based paint is also non-flammable and non-toxic, making it much safer to use than other options. This type of paint is also easy to apply and clean up if you make a mistake.
Cons Of Latex-Based Paint
However, there are also some disadvantages to using latex-based paint for waterproofing your boat. One issue is that latex-based paint can swell and crack if painted on wood surfaces. This type of paint also takes a long time to cure, which means it can crack on rough surfaces if you’re not careful. Also, latex-based paint won’t adhere well to dirty surfaces, so you’ll need to ensure the surface you’re painting is clean before getting started. Finally, this type of paint shouldn’t be used on things that will be touched or moved often, as it can peel or crack over time.
In Conclusion
Waterproofing your plywood is an important part of building or repairing boats. Sealing boat plywood is important in order to extend its lifespan and protect it from damage. The sun’s UV rays, water, and humidity can all cause significant damage to exposed plywood. By sealing the wood, you can create a barrier that will help protect it from the elements.
By following one of these methods, you can extend the lifespan of your plywood and keep your boat in good condition for years to come.